

19 Aug How to Set Up a Wash Mat Water Reclamation System, Step by Step
A wash mat water reclamation system looks like a lot of parts in the box: mat, pump, hose, tank, fittings, valve. In practice there is a one time assembly that takes about fifteen minutes with a single wrench, and then a job site routine you will run in your sleep by the end of the first week.
This guide walks through both, based on the setup for Rightlook.com’s Wash Mat Kit Water Reclamation System. Most mat, pump, and tank systems follow the same logic.
What Comes in a Complete Kit
- Wash mat. The heavy duty containment mat that goes under the vehicle.
- Submersible reclaim pump. A flat style pump that removes water down to about a sixteenth of an inch.
- 25 foot discharge hose. Connects the pump to the tank.
- Water storage tank. A poly tank with an upper inlet port and a lower drain port.
- Quality hose fittings. Pre taped with plumber’s tape, one for each tank port.
- Quality shut off valve. A ball valve for the drain port, so you can empty the tank in a controlled way.
You will need one tool: a 1 1/8 inch wrench for the tank fittings.
One Time Assembly: Before Your First Job
You only do this part once.
- Install the hose fittings in both tank ports. Thread one pre taped fitting into the upper side port and the other into the lower drain port. Start each by hand until snug, then finish with the wrench. Snug is enough. The fittings thread into plastic, and overtightening can crack the threads.
- Attach the shut off valve to the lower port. Thread the ball valve onto the lower drain fitting by hand until snug. Leave it closed, with the handle perpendicular to the fitting, whenever you are not draining.
- Connect the hose to the upper port. Screw one end of the 25 foot discharge hose onto the upper fitting, hand tight. The free end will connect to the pump at each job.
That is the whole assembly. From here on, everything is job site routine.
The Job Site Routine
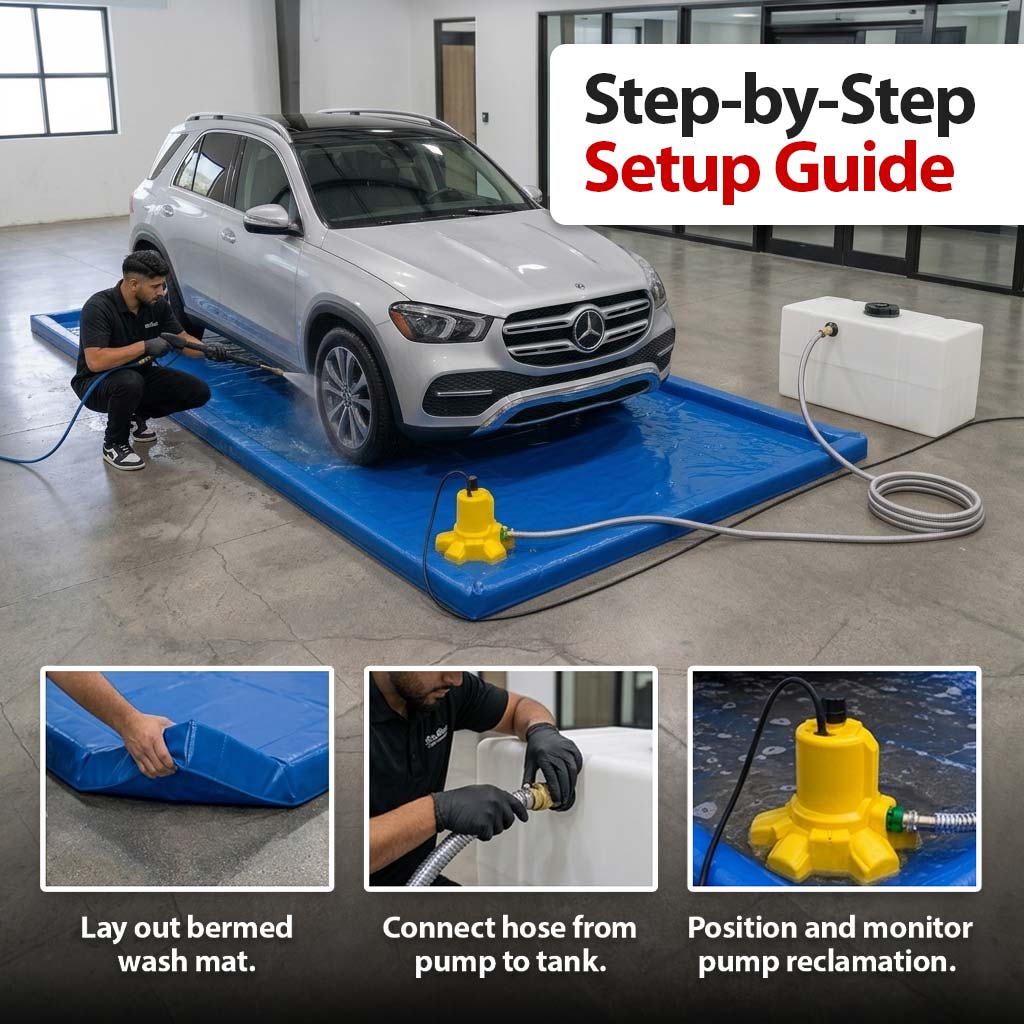
- Lay out the mat. Unfold it on a flat or slightly graded surface and position the vehicle on top. Note which way the surface slopes, because water will collect at the lowest point of the mat.
- Place the pump at the low point. Set the pump flat on the mat at the lowest corner or edge, where water will pool.
- Connect the hose to the pump. Attach the free end of the hose to the side discharge outlet on the pump. Twist off the discharge cap first, and make sure any unused discharge outlets are capped tight. The side outlet is the right one for flat surface water removal.
- Position the tank. Keep the tank within hose reach with the upper fitting accessible, and confirm the drain valve is closed.
- Wash the vehicle. Work normally. Wash water collects on the mat and flows toward the pump.
- Plug in the pump once water accumulates. Use a GFCI protected outlet, always. The pump starts moving water to the tank immediately, and it needs only about three sixteenths of an inch of water to begin pumping.
- Monitor as you work. The pump runs continuously while plugged in. Glance occasionally to confirm the hose is secure and water is flowing to the tank.
- Unplug when finished. The pump has no on and off switch, so unplugging is how you stop it. Do not let it run dry, because running without water can damage the motor.
Then fold the mat, stow the gear, and leave nothing behind but a clean vehicle and a dry driveway. For what to do with the water in the tank, see our guide to disposing of reclaimed wash water.
Five Mistakes That Cause Most Problems
- Overtightening the tank fittings. Cracked plastic threads are the most common assembly injury. Hand snug, then a gentle wrench finish.
- Putting the pump at the wrong spot. If the pump is not at the low point, it starves while water pools elsewhere on the mat.
- Skipping the GFCI outlet. You are running an electric pump in standing water. GFCI protection is non negotiable.
- Leaving the pump running dry. Unplug as soon as the water is reclaimed.
- Transporting with the valve open or loose. Confirm the drain valve is fully closed before you drive. A tank of dirty water emptying into your van is a lesson you only need once.
Quick Care Habits
A few seconds of maintenance keeps the system reliable: rinse the pump with clean water after use, unwind the hose fully before each job to avoid kinks, check that fittings are hand tight and leak free, rinse the tank interior periodically so soap and chemicals do not build up, and store everything cool and dry where the pump cannot freeze. Our wash mat care and storage guide covers the longer term maintenance schedule.
Frequently Asked Questions
How long does setup take on a job?
After the one time assembly, expect five to ten minutes to lay out the mat and connect the pump, and about the same to break down.
What if the customer has no outdoor outlet?
Any GFCI protected power source works, including an inverter or generator on your rig. Many mobile detailers carry one anyway.
Can the vehicle drive onto the mat without damaging it?
Yes. Drive on slowly. A quality foam berm compresses under the tires and springs back.
Where should the tank ride during transport?
Secured upright with the valve closed. Empty it at your approved disposal point rather than driving routes with a full tank, since water is about eight pounds per gallon.
Set Up Once, Wash Anywhere
The system rewards a little practice with a workflow that makes every location a legal wash site. Get the complete Wash Mat Kit Water Reclamation System, with the mat, pump, hose, scoop, and tank, at Rightlook.com, and call or text 858-271-4271 if you want a walkthrough before you buy.
Image note: Some images in this article may be AI-generated or AI-enhanced for illustrative purposes and may differ from the actual product.